
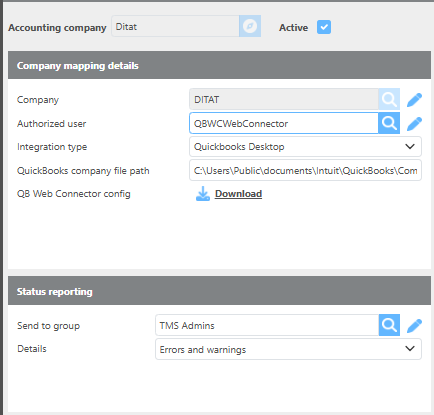
To set up a QuickBooks Desktop connection, you will need to add a new accounting company setup in the Ditat TMS. A separate company must be created for each Ditat company that needs data transferred to QuickBooks.
Setting Details
|
Field |
Description |
|
Company |
Select the Ditat company to connect to QuickBooks. |
|
Authorized user |
Select the QB sync user for this setup. Each setup requires a unique user. This user must be added to the QBWebConnectorUsers user group. |
|
Integration type |
Select the accounting integration type you are configuring. |
|
QuickBooks company file path |
Enter the network path to your QuickBooks company file. |
|
QB Web Connector config |
Click this button to download the Web Connector configuration file for this company. The Web Connector is used to sync data between Ditat and QuickBooks. |
|
Send to group |
Select the user group that should receive notifications after each QB sync. |
|
Details |
Select what level of information should be sent to the notification group after each sync. See the recommendation below. |
Reporting Detail Recommendation:
Start with Details during initial setup so you can see how data is being transferred.
Once the integration is running normally, switch to Errors and Warnings so you are only notified when there is an issue.
Errors Only is not recommended — you will not receive notifications when items need to be mapped, which can cause syncs to silently fail.
Note: Default AR/AP account data will be populated after your first sync. Ditat will pull these accounts from QuickBooks so you can configure how data should flow in each subsequent sync.
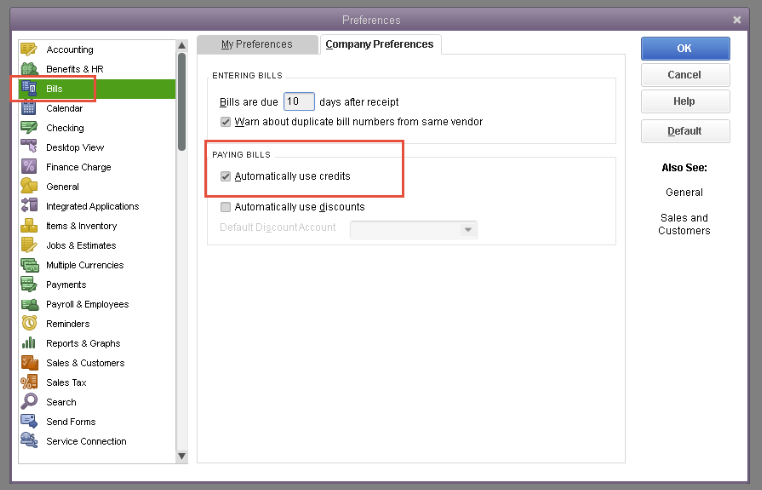
Extra Settings
To control how credits are applied in QuickBooks, update the following setting in your QuickBooks account:
-
In QuickBooks, go to Edit → Preferences.
-
Navigate to the Bills section.
-
Check or uncheck the Auto Apply Credits option based on your preference:
-
Checked – Credits will be automatically applied.
-
Unchecked – Credits will not be automatically applied.