
To set up a QuickBooks Online connection, you will need to add a new accounting company setup in the Ditat TMS. A separate company must be created for each Ditat company that needs data transferred to QuickBooks.
Setting Details
|
Field |
Description |
|
Company |
Select the Ditat company to connect to QuickBooks. |
|
Authorized user |
Select the QB sync user for this setup. Each setup requires a unique user. This user must be added to the QBWebConnectorUsers user group. |
|
Integration type |
Select the accounting integration type you are configuring. |
|
Link with QuickBooks Online |
Click this button to be redirected to the QuickBooks login page. A QuickBooks admin user must enter their credentials to authorize the connection. |
|
Link Notification Icon |
Indicates the current connection status. A yellow checkmark means the connection is healthy. A red info circle means there is a connection issue that needs to be resolved. |
|
Send to group |
Select the user group that should receive notifications after each QB sync. |
|
Details |
Select what level of information should be sent to the notification group after each sync. See the recommendation below. |
Reporting Detail Recommendation:
Start with Details during initial setup so you can see how data is being transferred.
Once the integration is running normally, switch to Errors and Warnings so you are only notified when there is an issue.
Errors Only is not recommended — you will not receive notifications when items need to be mapped, which can cause syncs to silently fail.
Note: Default AR/AP account data will be populated after your first sync. Ditat will pull these accounts from QuickBooks so you can configure how data should flow in each subsequent sync.
Sync Behavior
-
The QuickBooks Online integration syncs every 15 minutes, but only when there is data in Ditat to send to QuickBooks.
-
If you make updates to the Chart of Accounts or QuickBooks Items, those changes may take up to 1 hour to appear in Ditat if there is nothing in the send queue at the time.
-
Ditat will import a maximum of 1,000 items from the QuickBooks Items list for use on invoices.
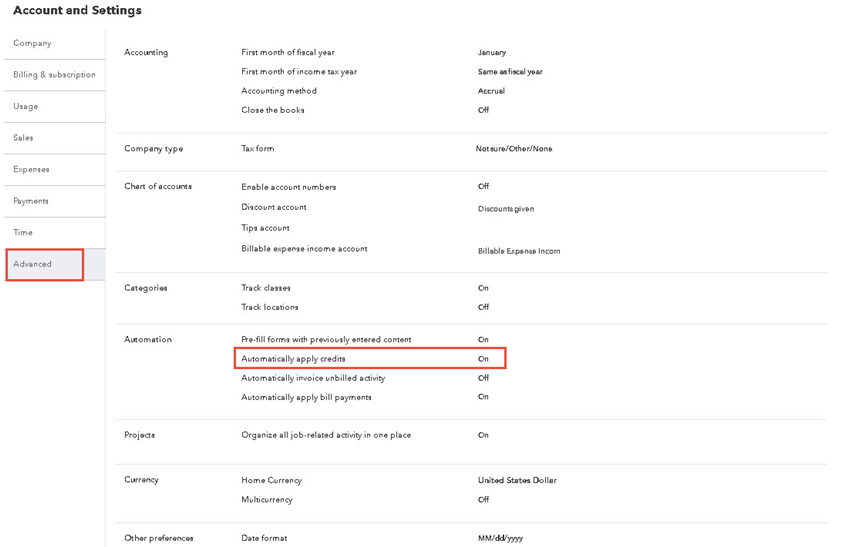
Extra Settings
The following settings can be adjusted in your QuickBooks Online account preferences:
-
Auto Apply Credits – Enable this setting to have credits automatically applied, or disable it to apply credits manually.
Duplicate Entry Warnings – Disable this setting to stop receiving duplicate entry warning messages in Ditat, or enable it to continue receiving them.
