
Navigation: Rate & Pay → Rate Plans
Click here for information on how to use a data entry window.
A common practice is to create separate rate plans for different customers and use the customer name as the Rate Plan ID for easy identification.
Lanes
Use the Column Selector tool to choose which columns are displayed in the lanes section.

|
Field |
Description |
|
Plan Id |
Can be up to 25 characters and must be unique within the system. If you enter an ID that already exists, that rate plan will be loaded for editing. Otherwise, a new rate plan will be created. |
|
Active |
Check this box if this rate plan is currently in use. If unchecked, the plan will not be available for selection on customer profiles. |
|
Lanes |
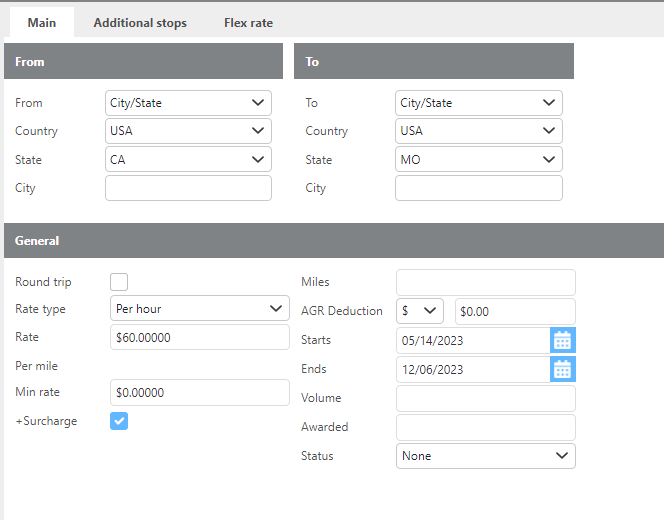
Define the routes and rates for this plan. Each lane requires a From and To location (by country, state, city, or zone) and the rate to charge for that route. Optional date ranges can be set using the Starts and Ends fields. If a mileage value is entered, it will be used to calculate fuel surcharges instead of the trip's actual miles. |
|
From |
Select how to define the origin of the lane: Locations, Zones, City/State, Postal Codes, or Country. Check the corresponding box above the lanes to enable that option. |
|
To |
Select how to define the destination of the lane: Locations, Zones, City/State, Postal Codes, or Country. Check the corresponding box above the lanes to enable that option. |
|
Round Trip |
Check this box if the lane is for a round trip. The shipment's starting and ending location must match the From location, with a stop in the middle matching the To location. |
|
Rate type |
Select whether this lane is rated as Fixed, Per Mile, or Per Hour. |
|
Rate |
Enter the rate to charge for this lane. |
|
Per mile |
If a fixed rate and mileage are both entered, the system will calculate the per-mile rate automatically. |
|
Min rate |
Enter a minimum charge for this lane. For example, a rate of $2.00/mile with a minimum of $200.00 means a 50-mile shipment would be charged $200.00 instead of $100.00. |
|
Surcharge |
Check this box to add a fuel surcharge to the rate for this lane. A fuel surcharge table must be configured on the Options tab for this to calculate. |
|
Miles |
If an agreed-upon mileage exists for this lane, enter it here. The system will use this value instead of the calculated miles when determining rates and fuel surcharge amounts. |
|
AGR Deduction |
Adjust the AGR for this lane by entering a fixed dollar amount or percentage to deduct from what is billed to the customer before paying drivers. Commonly used for sales commissions or fixed fees associated with the lane. |
|
Starts |
Enter the date the system should begin using this lane. If blank, the lane will be active immediately. |
|
Ends |
Enter the date the system should stop using this lane. If blank, the lane will remain active indefinitely. |
|
Volume |
Enter the expected volume for this lane. |
|
Awarded |
If additional runs were awarded for this lane, enter the awarded amount here. |
|
Charges |
Click the pencil icon to add extra charges that always apply to this lane, such as a lumper charge. |
|
Stops |
Click the pencil icon to add approved extra stops for this lane and any additional mileage that should be added when those stops are used. The Process Extra Stops option must be enabled on the Options tab for this to apply. |
|
|
Click the shortcut icon to open the lane customizer, or double-click anywhere on a lane row to open it. The lane customizer has three tabs: |
|
Tab |
Description |
|
Main |
Create or edit the lane settings. |
|
Additional Stops |
Set up lane-specific additional stop locations. If additional stops are added, the miles can be used to add to the charge for this lane. If any stops are addedd those are the only stops that will be allowed as extra stops for this lane. |
|
Flex rate |
Set up flex rate rules and any lane-specific additional charges. |
Flex Rate
The Flex Rate tab displays all lane-specific flex rates and additional charges. Use the pencil icon to edit an existing flex rate or click Add to create a new one.


|
Field |
Description |
|
Payment type |
Select the payment type to use for charging this customer. |
|
Condition |
Select the condition that must match (or not match) to apply the charge. Conditions include Reefer, Hazmat, Team, Billing Company, and Equipment Type. |
|
Quantity |
Enter the quantity to use for this payment type. |
|
Apply |
Select whether to Add a New Line, Adjust Existing Line, Replace Existing Line, or Remove Existing Line. |
|
Rate |
Enter the rate to use for this payment type. |
|
Min pay/ Max pay |
Enter the minimum or maximum amount to charge for this lane, if applicable. |
|
Description |
Enter a description that will appear on the charge line, if applicable. |
Stops

|
Field |
Description |
|
Type |
Select how to define accepted extra stop locations: City/State, Postal Code, Location, or Zone. |
|
Location |
If Location is selected, choose the accepted locations for extra stops. |
|
Zone |
If Zone is selected, choose the accepted zones for extra stops. |
|
Country |
If City/State is selected, choose the accepted country. |
|
State |
If City/State is selected, choose the accepted state. |
|
City |
If City/State is selected, choose the accepted city. |
|
Postal code |
If Postal Code is selected, enter the accepted zip code. |
|
Add miles |
Enter the number of extra miles to account for when this stop is used on a shipment. |
Main
|
Field |
Description |
|
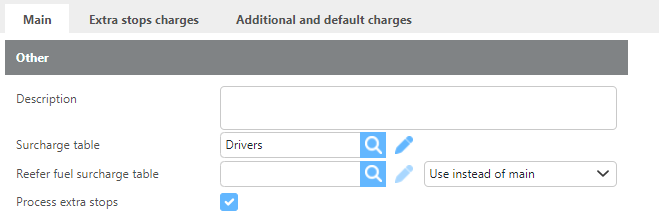
Description |
Enter details about this rate plan to clarify its purpose. |
|
Fuel surcharge table |
Select the fuel surcharge table to apply to this rate plan. |
|
Reefer fuel surcharge table |
Select a fuel surcharge table to use when a reefer is involved. This can be used instead of or in addition to the main fuel surcharge table. Use the drop-down to select how reefer fuel should be applied. |
|
Process extra stops |
Check this box to apply lane-specific extra stop rules when calculating rates. If unchecked, lanes with extra stops will be ignored. |
|
Extra stops charges |
Define stop charges to apply when extra stops are present on a shipment. |
|
Additional charges |
Add custom charges that apply to specific circumstances and adjust the rate for certain lanes, such as team loads, reefer requirements, or hazmat. |
Extra Stops Charges

Example: The customer is charged $50 for the first extra stop and $35 for each additional stop from the second through the fifth.
Rate Plans Tutorial Video