
To access: System → Set Up Options
Click here for information on how to use a data entry window.
System options control how dates, times, and other system-wide settings are configured throughout the Ditat TMS.
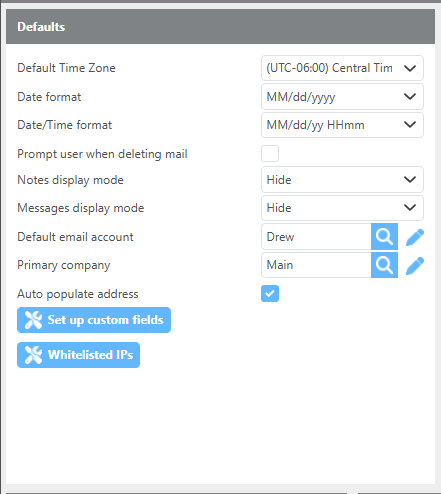
Defaults
|
Field |
Description |
|
Default Time Zone |
Sets the time zone that will be applied by default when a new user is created. |
|
Date format |
Sets how dates are displayed throughout the TMS. |
|
Date/Time format |
Sets how dates and times are displayed throughout the TMS. |
|
Prompt user when deleting mail |
When checked, users will be prompted to confirm before deleting a mail message. |
|
Notes display mode |
Controls how notes appear when opening a screen. Hide – Notes are hidden by default. Show – Notes are always visible. Dynamic – Notes are shown only if a saved note exists. |
|
Messages display mode |
Controls how the messages box appears when opening a screen. Hide – The messages box is hidden. Show – The messages box is always visible. |
|
Default email account |
The primary email account used for sending emails to drivers and dispatch, as well as for sending invoices. |
|
Primary Company |
The default company applied to drivers, carriers, and companies when they are added to the system. This can be changed on individual records. The logo associated with this company will appear on the Carrier/Driver and Customer portals. |
|
Auto-populate address |
When checked, users will receive address suggestions when entering locations on shipments, customers, and other screens. Address suggestions are provided by ESRI if selected as the Geocode provider, or by Google Maps for all other providers. |
|
Set up custom fields |
Opens the custom fields setup to add custom fields to applicable screens. |
|
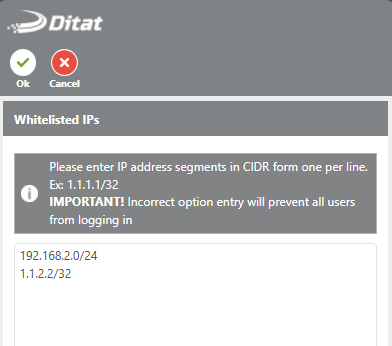
Whitelisted IP’s |
Opens the IP whitelist, where you can define a list of trusted IP addresses or address ranges permitted to access your account. All other IP addresses will be blocked. |
IP Whitelisting
IP addresses can be entered individually or as CIDR blocks. For more information about CIDR notation, see:
Examples:
-
Single IP address:
192.168.2.101/32 -
CIDR block (254 addresses):
192.168.1.1/24— covers192.168.1.0to192.168.1.255 -
CIDR block (65,534 addresses):
192.168.1.1/16— covers192.168.0.0to192.168.255.255
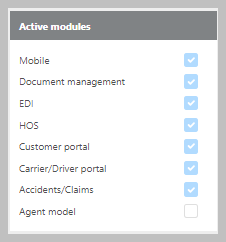
Active Modules
Modules must be activated by Ditat. For questions about modules, contact support@ditat.com. For pricing information, contact sales@ditat.com.
|
Module |
Description |
|
Mobile |
Enables the Mobile tab in the TMS. Allows GPS tracking for drivers, trucks, and trailers, and is required for drivers to log in to Ditat Mobile Dispatch. |
|
Document Management |
Enables the Document Management tab in the TMS, allowing documents to be stored and managed on records. |
|
EDI |
Enables the EDI tab in the TMS, where EDI partners can be set up and EDI loads imported. |
|
HOS |
Enables HOS data from your ELD provider to display on truck info cards. For a list of supported ELD providers,here or email Sales@ditat.com. |
|
Customer portal |
Enables a separate portal where customers can view shipments and invoices online. |
|
Carrier/Driver portal |
Enables a separate portal where carriers and drivers can view trips, settlements, and deduction information online. |
|
Accident/Claims |
Enables the Accidents section (located under Assets) and the Claims section (located under Rate & Pay). |
|
Agent model |
Allows administrators to restrict users from viewing certain data within the system. |
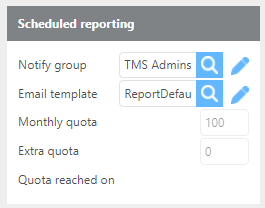
Scheduled Reporting
|
Field |
Description |
|
Notify Group |
The user group that will be notified by email if an error occurs during a scheduled report. |
|
Email template |
The email template to use for scheduled report notifications. |
|
Monthly quota |
The total number of scheduled reports allowed per month (default: 100). |
|
Extra quota |
The number of reports run beyond the monthly quota. |
|
Quota reached on |
The date during the current month when the quota was reached. |
Actions
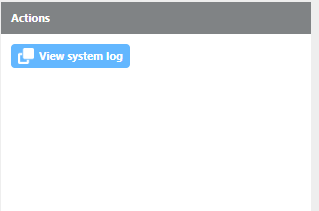
|
Module |
Description |
|
View System Log |
Opens the log of system messages and errors. |
Maps/Routing

|
Module |
Description |
|
|
Address autocomplete provider |
The service used to suggest addresses as they are typed in the TMS. Options are ESRI (default), Google Maps, or None. |
|
|
Geocode Provider |
The service used to geocode addresses. All accounts use ESRI by default. |
|
|
Route Provider |
The service used to calculate routes. All accounts use ESRI by default. |
|
|
Google Maps Avoid tolls |
When checked, toll routes will be excluded from route calculations. |
|
|
Avoid Ferries |
When checked, ferry routes will be excluded from route calculations. |
|
|
Avoid highways |
When checked, highway routes will be excluded from route calculations. |
|
|
Avoid Borders |
When checked, routes that cross borders will be excluded from route calculations when possible. |
|
|
Prefer |
Select if you would prefer the shortest or fastest route to be calculated. |
|
|
PC Miler Routing Type |
If you are using PC Miler you can choose if you would like to use the Practical, shortest or Fastest Miles to create routes. |
|
|
Tolls |
Sets how toll roads are handled on routes. Options are Always Avoid, Avoid if Possible, and Use. |
|
|
Allow border crossing |
When checked, routes may cross US borders. When unchecked, routes will avoid borders unless a stop is located in another country. |
|
|
Avoid ferries |
When checked, ferry routes will be excluded from route calculations. |
|
|
Truck style |
Sets the type of truck used for route calculations. Options include: None, 28' Double Trailer, 40' Straight Truck, 48' Semi Trailer, 53' Semi Trailer, Full Size Van, 26' Straight Truck, and Conventional School Bus. |
|
Ditat does not recommend using Google Maps as a routing provider, as it calculates passenger vehicle routes rather than truck-specific routes. Additionally, Google Maps mileage may vary from load to load due to real-time variables such as road construction and weather.
Routing Provider note: For the most consistent truck-specific routing, PC Miler is recommended, as it uses a fixed API version and truck-specific routing algorithms.