
To access: Dispatch → Enter Shipments
Click here for information on how to use a data entry window.
The Maintain Shipments screen is where you look up existing shipments and create new ones.
Shipment ID and Navigation
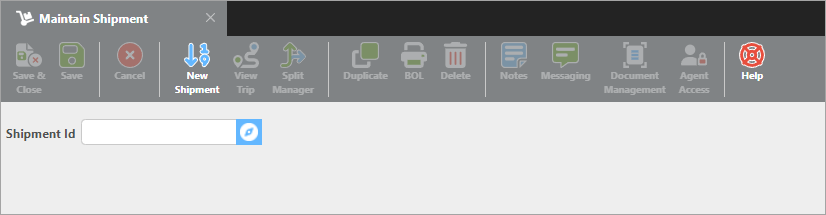
Shipment ID – A unique ID of up to 25 characters. If an existing ID is entered, that shipment record will be retrieved for editing.
Search Navigation Icons

Use the navigation icons on the toolbar to move to the next or previous shipment, or to quickly find the last shipment entered.
New Shipment
To create a new shipment, click the New Shipment button — the system will assign a Shipment ID automatically when the load is saved
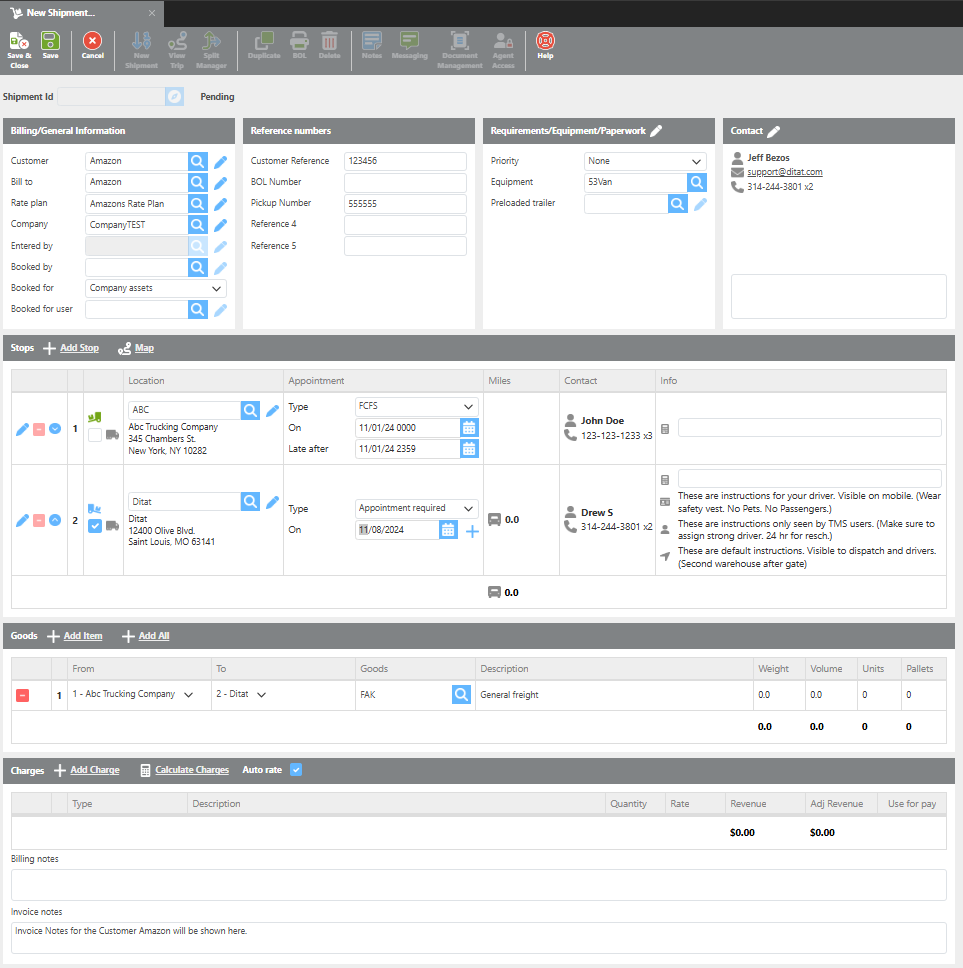
Data sent to the Mobile App: Reference Numbers 1–5, Priority, Preloaded Trailer Number, Reefer Temp/Mode, Tarps Required and details, Weight, Units, Pallets, and Goods.
Validation Errors
The toolbar will display any errors that must be resolved before the shipment can be saved. A single error will display as a message directly on the toolbar. If there are multiple errors, a count will be shown — click View Message to see the details for each issue.
|
Section |
Tool Bar |
|
Field |
Description |
|
View trip |
Switches to the trip view. If no driver has been assigned yet, this opens the Trip Assignment Wizard. |
|
Split manager |
Opens the Split Manager to split the shipment into multiple trips. This can also be done from the trip screen. Click here for more information on splitting loads. |
|
Duplicate |
Creates a duplicate of the current shipment using the duplication method set in Dispatch Setup Options. Click here for information on setting the duplication method. |
|
BOL |
Opens a Bill of Lading that can be printed or saved. |
|
Notes |
Opens or closes the notes section for this shipment. |
|
Messaging |
Opens or closes the messaging section, displaying all messages between drivers and dispatchers related to this shipment. |
|
Document Management |
Opens the document management folder for this shipment, where related documents can be uploaded. |
|
Section |
Billing/General Information |
|
Field |
Description |
|
Customer |
The customer who booked the shipment. |
|
Bill To |
The customer to be billed for the shipment. Auto-populated from the Customer field but can be changed if needed. |
|
Rate Plan |
The rate plan used to bill the customer. Auto-populated from the customer's assigned rate plan. If no plan is assigned, a rate plan can be selected manually or charges can be entered manually. |
|
Company |
The company that will bill this customer. Auto-populated from the Customer field but can be changed if needed. |
|
Entered by |
Auto-populated with the username of the user who created the shipment. |
|
Booked By |
The user who booked the shipment. Auto-populated if a default is set on the customer's profile. |
|
Booked for |
Indicates whether this shipment is for company assets or brokerage. Auto-populated using the default set in Dispatch Options. Click here for details on setting this default. |
|
Section |
Reference numbers |
|
Reference Numbers |
Up to five reference number fields are available for each shipment. These field labels can be renamed in the Dispatch Setup Options screen to match your company's terminology. |
|
Section |
Requirements Equipment/Paperwork (Use the pencil to open and edit what will be on the load.) |
|
Priority |
Sets the load priority level. Options are None, Low, Medium, High, and Urgent. Priority is displayed on the Planning and Dispatch Boards. |
|
Equipment |
The type of equipment required for this shipment. |
|
Preloaded trailer |
If a preloaded trailer will be picked up for this load, select it here. It will be added to the trip when assigned. |
|
Refer Temp |
The required temperature if a reefer is needed. |
|
Refer Mode |
The reefer temperature mode: Start/Stop, Continuous, or Off. |
|
Team required |
Check if a team driver is required for this load. |
|
Hazmat |
Check if this is a hazmat load. |
|
Tarp Required |
Check if a tarp is required. When checked, a text field appears to enter the tarp length or details. |
|
Bars./straps required |
Check if bars or straps are required. When checked, a text field appears to enter the specifics. |
|
Pilot car required |
Check if a pilot car is required for this load. |
|
Oversize permit required |
Check if an oversize permit is required. |
|
Overheight permit required |
Check if an overheight permit is required. |
|
Overlength permit required |
Check if an overlength permit is required. |
|
Overwidth permit required |
Check if an overwidth permit is required. |
|
Overweight |
Check if an overweight permit is required. |
|
Cargo Value |
The estimated value of the cargo. |
|
Original Paperwork |
The date the original paperwork was received. |
|
Section |
Contact |
|
Load Contact |
The Load Contact section displays contact information for this shipment, defaulted from the selected customer. This can be updated on a per-load basis as needed. |
|
Section |
Stops |
|
Add stop |
Adds an additional stop to the shipment. Every shipment requires at least one pickup and one delivery stop, but can have multiple of each type. |
|
Map |
Displays the route based on your system's Geocode provider. |
|
Stops |
Enter the stop information. If more stops are needed, use the Add Stop button. Use the Pencil next to the stop to edit any information on the stop or add notes for the driver/dispatcher. |
|
Truck/Trailer Icons |
Next to the location, there are truck Icons to tell you what is happening at that stop.
Pickup Location
Delivery location Location is a Drop & Hook Site. 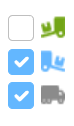
Note: Extra stops must be specified as pickup, delivery, or both, and whether they involve a drop and hook. |
|
Location |
Select a configured location from your account. Using saved locations is recommended for frequently used stops, as they support notes and improve reporting. |
|
Appointment |
Sets the appointment type: FCFS (First Come, First Served — allows a date range), Appointment Set (Enter specific date/time, click the "+" next to the clock to add an optional Late After time), or Appointment Required (used when the appointment still needs to be scheduled). |
|
Miles |
Miles between stops are calculated by your Geocode provider when the shipment is saved. |
|
Contact |
Contact information for each stop. Defaulted from the location if one is selected. Edit using the pencil icon on the left of the stop line. |
|
Info |
Additional stop information such as reference numbers, pickup instructions, or contact numbers. |
|
Driver Notes |
Pre-filled from the location record. Sent to the driver via the mobile app and included on the BOL. Can be edited per load using the pencil icon. |
|
Dispatch Notes |
Pre-filled from the location record. Not sent to the driver or included on the BOL. Can be edited per load using the pencil icon. |
|
Directions |
Pre-filled from the location record. Sent to the driver via the mobile app and included on the BOL. Can be edited per load using the pencil icon. |
|
Section |
Goods |
|
Add Item |
Adds a new goods line. A goods line is required for each stop to specify what is being picked up or delivered. |
|
Add All |
Adds all combinations of pickup and delivery stops automatically. Useful when multiple stops share the same goods type. |
|
Goods |
The type of goods for each stop. Select from a preset list or type a custom description. |
|
Weight/Volume/ Units/Pallets |
Quantity and measurement details for the load. |
|
Section |
Charges Note: Ditat uses the Bankers' Rounding method when calculating rates. |
|
Add Charge |
Adds a manual charge line. Manual charges have a white background and will not be recalculated by Auto Rate & Pay. |
|
Calculate charges |
Calculates charges using the rate plan assigned to the shipment. Calculated charges have a grey background and will be recalculated by Auto Rate & Pay throughout the load's lifecycle. |
|
Auto Rate |
Available only when Auto Rate & Pay is enabled. When checked, the system will continue to use the assigned rate plan to calculate charges as the load progresses. |
|
Type |
The payment type being charged. Lookup field for payment types configured in your system. |
|
Quantity |
The quantity to charge for this payment type. Can be negative to issue a credit to the customer. |
|
Rate |
The rate to charge for this payment type. Should always be a positive number. |
|
Adjusted Revenue |
Used by the system to calculate driver pay for percentage-based drivers. |
|
Use for Pay |
When checked, this charge will be included in driver pay calculations for percentage-based drivers. |
|
Section |
Notes |
|
Billing Notes |
Internal notes for the billing team. Auto-populated from the billing notes on the customer's profile. Displayed on billing screens and certain reports. |
|
Invoice Notes |
Internal notes relevant to invoicing. Auto-populated from the invoice notes on the customer's profile. |
Editing Shipment
Once a shipment is saved, you will have new options on the Tool Bar.

|
Field |
Description |
|
View Trip |
Opens the trip to assign a driver. |
|
Split Manager |
Splits the shipment between multiple drivers. |
|
Duplicate |
Creates a duplicate of this shipment. |
|
BOL |
Prints a Bill of Lading for this shipment. |
|
Delete |
Deletes the shipment. |
|
Notes |
Opens or closes the notes section. |
|
Messaging |
Views messages from drivers for all trips associated with this shipment. |
|
Document Management |
Opens a window where you can upload paperwork for this load. |
|
Agent Access |
Assigns agent access for this shipment. Only if you have the Agent Module on your account. |
|
Help |
Opens the help section for the current tab. |
Entering Shipments Video